
写在前面
实习以来帮hdrp改了不少资产,每次进ps做maskmap真的好麻烦,试试写个脚本工具来完成这个工作。
 它可以——
它可以——
 点击下载👉MapCreator👈
(下一个目标:批处理!)
点击下载👉MapCreator👈
(下一个目标:批处理!)
Unity Editor Window
先放一个完整的代码(Rider的高亮 好爱):
 首先创建一个工具窗口。新建脚本,编辑器窗口继承自EditorWindow类,需要使用UnityEditor命名空间。
using UnityEngine;
using UnityEditor;
public class ExampleWindow : EditorWindow{
MenuItem可以在菜单栏创建选项。
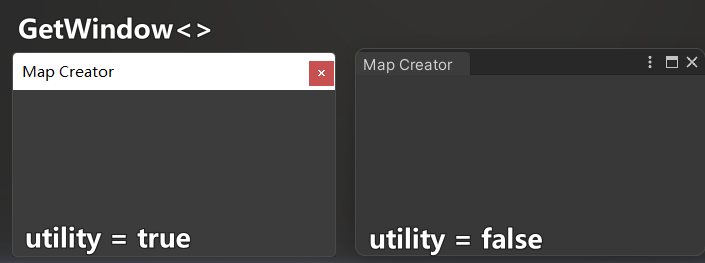
GetWindow方法可以打开窗口/聚焦到已打开的该窗口,
    [MenuItem("Window/Tools/Example")]
    public static void ShowWindow()
    {
        GetWindow<ExampleWindow>("Example");
    }
GetWindow可选参数包括Utility和Title,对于窗口的类型和标题。标题也可以直接赋值窗口类的titleContent.text属性。
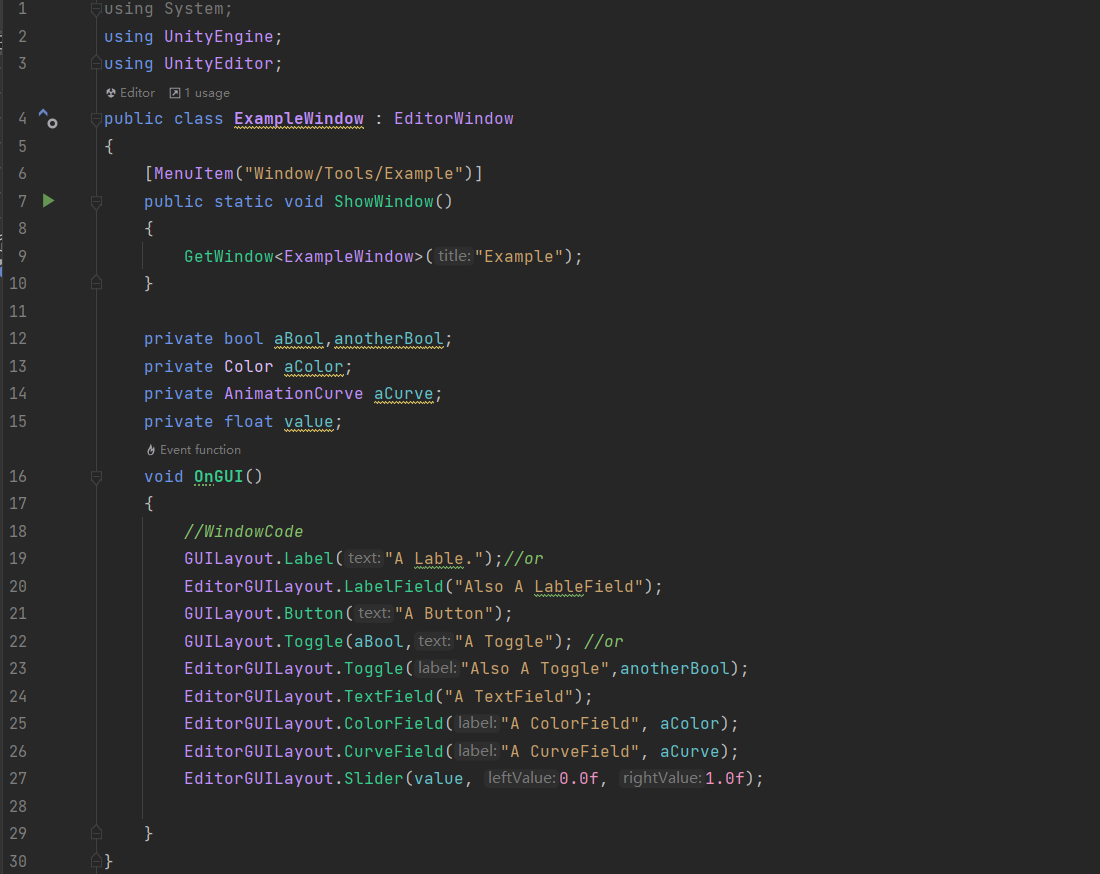
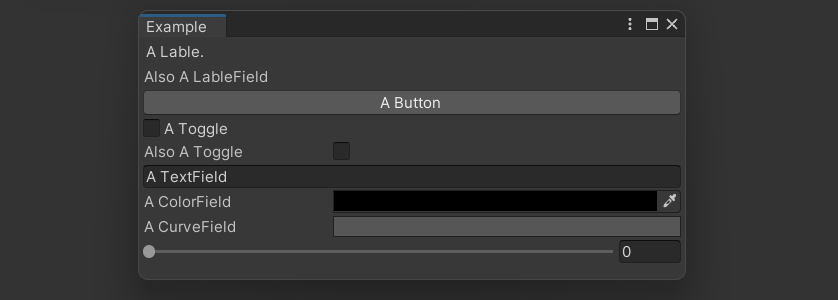
 UI元素一般属于GUILayout和EditorGUILayout两个类。有一些功能是重复的,不过都可以一样用~
    void OnGUI()
    {
        //WindowCode
        GUILayout.Label("A Lable.");//or
        EditorGUILayout.LabelField("Also A LableField");
        GUILayout.Button("A Button");
        GUILayout.Toggle(aBool,"A Toggle"); //or
        EditorGUILayout.Toggle("Also A Toggle",anotherBool);
        EditorGUILayout.TextField("A TextField");
        EditorGUILayout.ColorField("A ColorField", aColor);
        EditorGUILayout.CurveField("A CurveField", aCurve);
        EditorGUILayout.Slider(value, 0.0f, 1.0f);
    }
更详细的内容可以参考:
Get to work
工具的框架设计如图:
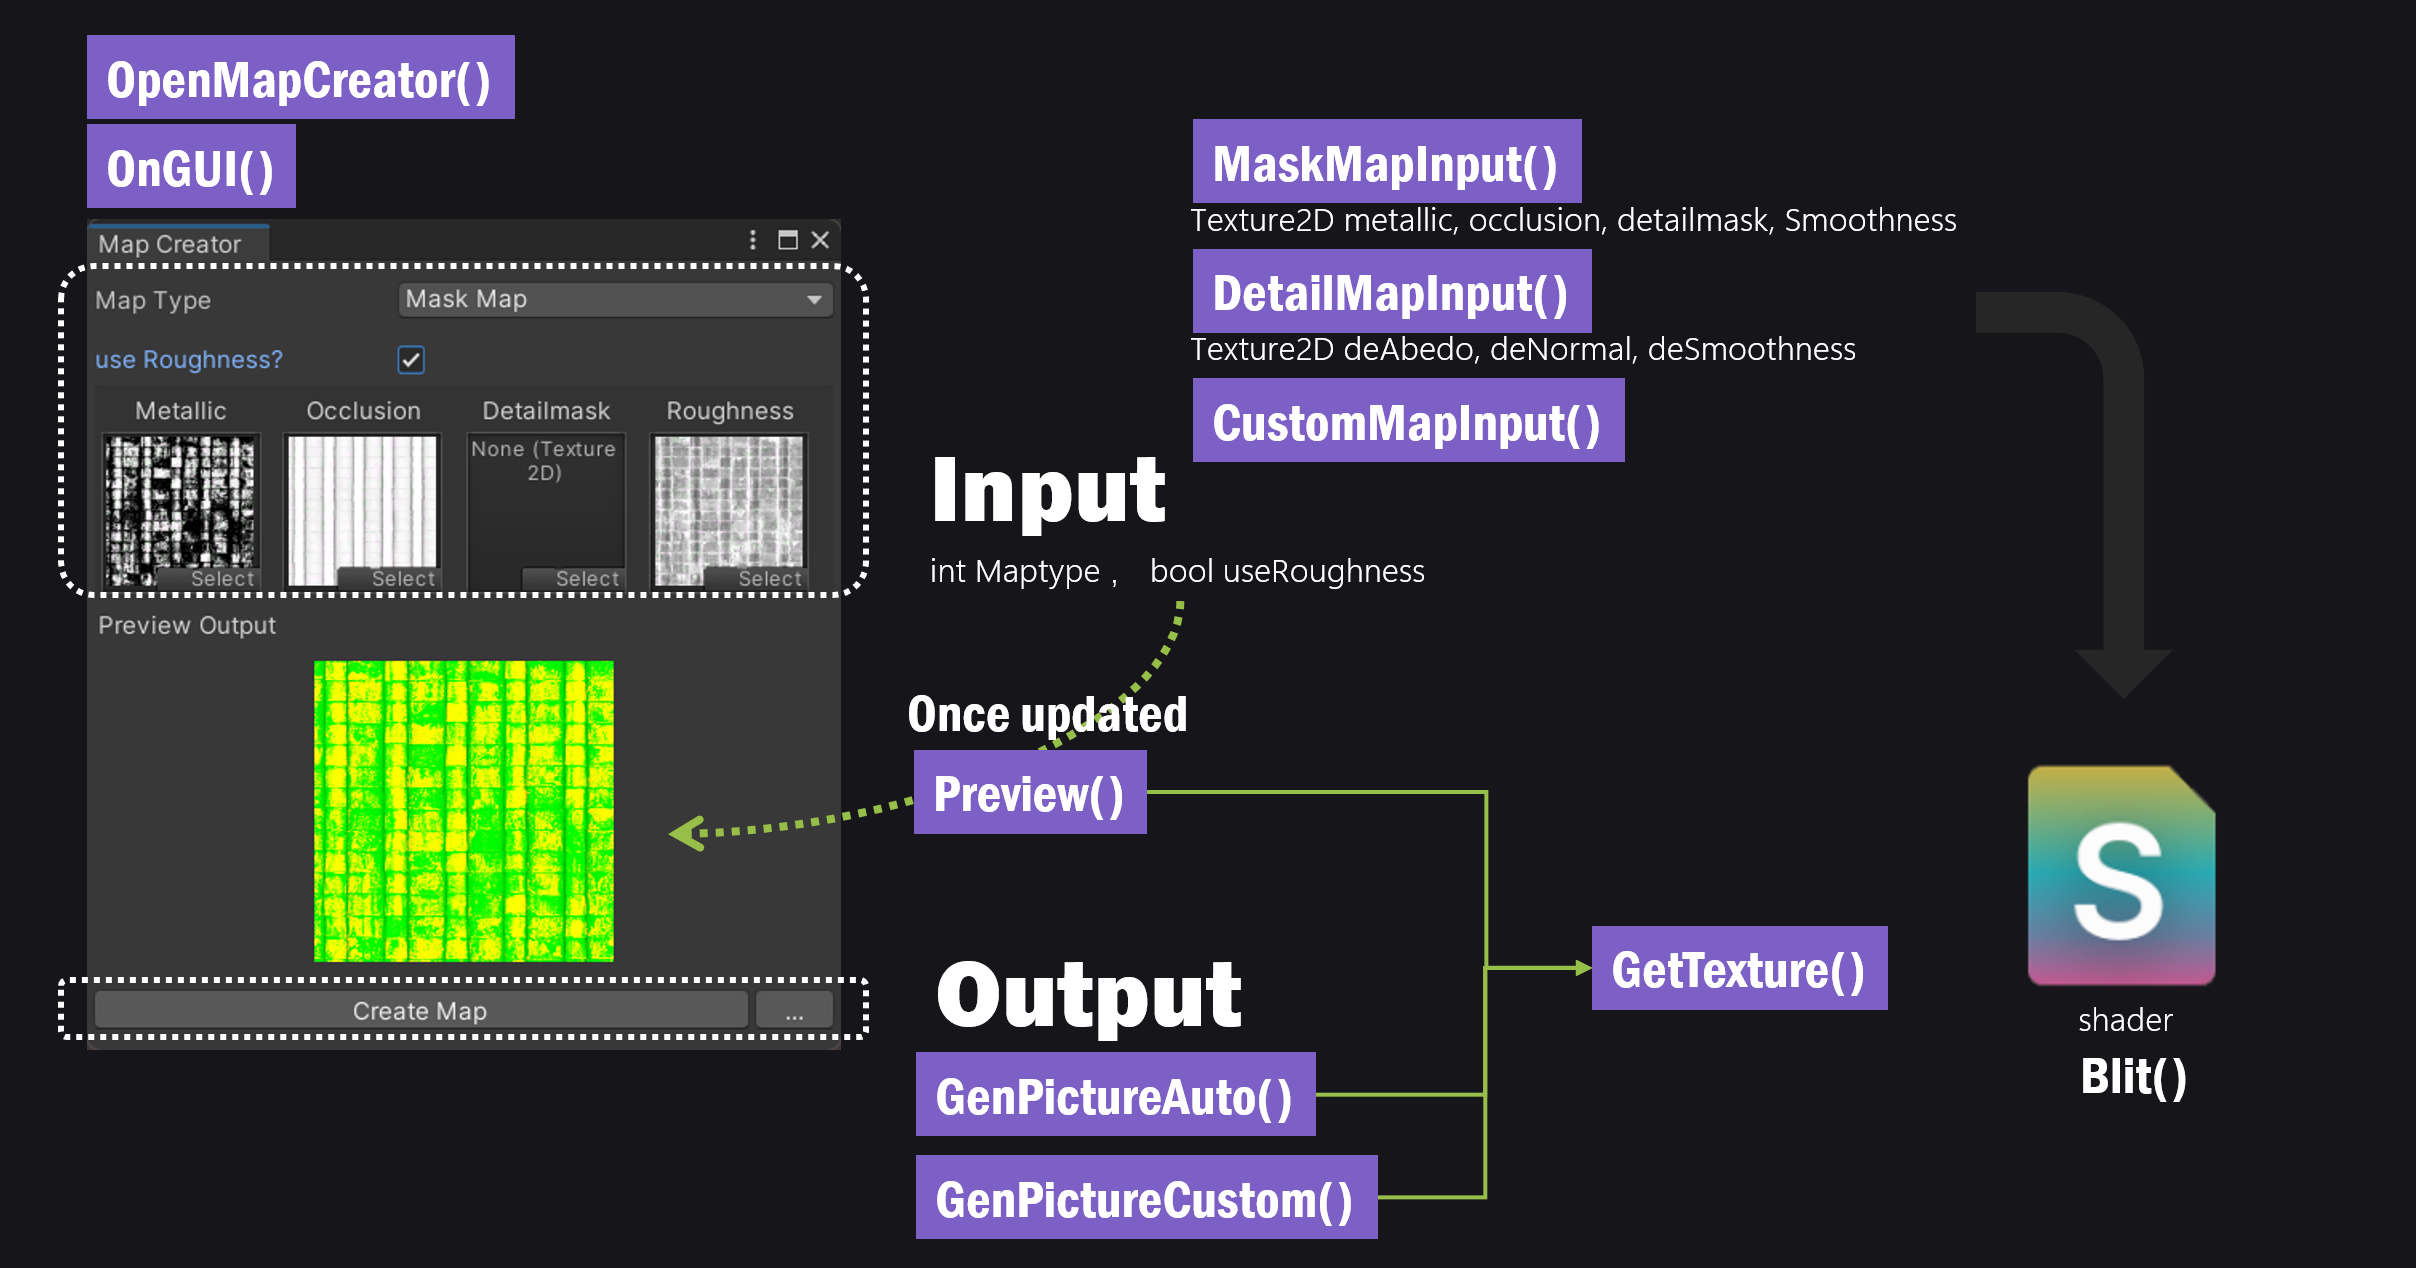 接下来就一步一步解释一下这个工具都做了啥——
首先声明我们需要的变量:
接下来就一步一步解释一下这个工具都做了啥——
首先声明我们需要的变量:
using System;
using System.IO;
using UnityEditor;
using UnityEngine;

public class MapCreator : EditorWindow
{
    private Material mat;
    private int maptype = 0,_maptype;
    private string[] maptypes = new string[] {"Mask Map", "Detail Map", "Custom"};
    private Texture2D metallic, occlusion, detailmask, smoothness, deAbedo, deNormal, deSmoothness;
    private bool useRoughness;
    //用以记录输入是否更新
    private bool changed;
    private Texture2D _metallic, _occlusion, _detailmask, _smoothness, _deAbedo, _deNormal, _deSmoothness;
    private bool _useRoughness;
我们希望每更换一张贴图时,preview都会刷新,所以设置了一组同名参数以记录参数是否变化。
    //创建菜单栏
    [MenuItem("Window/Tools/MapCreator")]
    //创建窗口
    static void OpenMapCreator()
    {
        MapCreator mapCreator = GetWindow<MapCreator>("Map Creator");
        mapCreator.Init();
    }
    //初始化材质
    private void Init()
    {
        if (mat == null)
        {
            mat = new Material(Shader.Find("Hidden/MapCreator"));//create material
            mat.hideFlags = HideFlags.HideAndDontSave;
        }
    }
    //窗口界面
    public void OnGUI()
    {
        //选择生成贴图类型
        GUILayout.Space(10);
        maptype = EditorGUILayout.Popup("Map Type", maptype, maptypes);
        GUILayout.Space(10);
        //绘制贴图盒
        if (maptype == 0 )//mask map
        {
            useRoughness = EditorGUILayout.Toggle("use Roughness?", useRoughness);
            MaskMapInput();
        }
        else if (maptype == 1) //detail map
        {
            useRoughness = EditorGUILayout.Toggle("use Roughness?", useRoughness);
            DetailMapInput();
        }
        else//custom map
        {
            EditorGUILayout.Space(20);
            CustomInput();
        }
        if (maptype != _maptype || useRoughness!=_useRoughness)
        {
            changed = true;
            _maptype = maptype;
            _useRoughness = useRoughness;
        }
        //绘制预览贴图
        Preview();
        //绘制创建按钮
        CreateMask();
    }
贴图盒部分由于要重复使用多次,包装成了一个独立的函数:
    private Texture2D TextureField(string name, Texture2D texture)
    {
        EditorGUILayout.BeginVertical();
        var style = new GUIStyle(GUI.skin.label);
        style.alignment = TextAnchor.MiddleCenter;
        style.fixedWidth = 80;
        GUILayout.Label(name,style);
        Texture2D result = EditorGUILayout.ObjectField(texture, typeof(Texture2D), false, GUILayout.Width(80),GUILayout.Height(80)) as Texture2D;
        EditorGUILayout.EndVertical();
        return result;
    }
使用这个函数,可以在不同maptype下绘制不同贴图选择盒:
private void MaskMapInput()
    {
        EditorGUILayout.BeginHorizontal("Box");
        _metallic = TextureField("Metallic", metallic);
        if (_metallic != metallic)
        {
            metallic = _metallic;
            changed = true;
        }
        _occlusion = TextureField("Occlusion", occlusion);
        if (_occlusion != occlusion)
        {
            occlusion = _occlusion;
            changed = true;
        }

        _detailmask = TextureField("Detailmask", detailmask);
        if (_detailmask != detailmask)
        {
            detailmask = _detailmask;
            changed = true;
        }

        if (!useRoughness)
        {
            _smoothness = TextureField("Smoothness", smoothness);
        }
        else
        {
            _smoothness = TextureField("Roughness", smoothness);
        }
        if (_smoothness != smoothness)
        {
            smoothness = _smoothness;
            changed = true;
        }
        EditorGUILayout.EndHorizontal();
    }
//DetailMapInput(),CustomMapInput()见源码
每当贴图类型或者输入贴图变化时,会通过这个函数更新输出预览:
    private Texture2D preview = null;
    private void Preview()
    {
        EditorGUILayout.BeginHorizontal();
        GUILayout.Label("Preview Output");
        EditorGUILayout.EndHorizontal();
        //居中绘制贴图框
        EditorGUILayout.BeginHorizontal();
        Rect previewRect = new Rect(this.position.width / 2 - 75, 200, 150, 150);
        //初始绘制默认纹理
        if (preview == null)
        {
            preview = Texture2D.blackTexture;
        }
        //每当输入参数改变时,刷新材质
        if (changed)
        {
            //path只用于自动更名保存,这里其实不需要
            string path = "";
            preview = GetTexture(ref path);
            changed = false;
        }
        //在贴图框中绘制贴图
        EditorGUI.DrawPreviewTexture(previewRect,preview);
        EditorGUILayout.Space(170);
        EditorGUILayout.EndHorizontal();
    }
这里是最重要的部分,GetTexture创建RT并使用Blit()将输出结果渲染至RT上。传入贴图时,还读取了贴图的尺寸和路径信息,以便维持输出贴图与原贴图的一致性。
    private Texture2D GetTexture(ref string path)
    {   //保持新创建的贴图与原贴图尺寸相同
        Vector2 rtSize = new Vector2(2048, 2048);
        //用于路径更名
        char[] splitor = {'_'};

        //传入shader所需参数
        Shader.SetGlobalInt("maptype", maptype);
        if (!useRoughness) Shader.SetGlobalInt("useRoughness", 0);
        else Shader.SetGlobalInt("useRoughness", 1);
        //传入shader所需贴图
        if (maptype == 1)
        {
            if (deAbedo != null)
            {
                mat.SetTexture("_deAbedo", deAbedo);
                rtSize.x = deAbedo.width;
                rtSize.y = deAbedo.height;
                path = AssetDatabase.GetAssetPath(deAbedo);
                path = Reverse(path);
                path = path.Split(splitor, 2)[1];
                path = Reverse(path);
            }
        //....其他贴图略,详见源码
        }

        //创建RT作为Blit()的渲染目标target
        RenderTexture tempRT = new RenderTexture((int)rtSize.x, (int)rtSize.y, 16, RenderTextureFormat.ARGB32);
        tempRT.Create();
        //创建texture作为Blit()的源材质source
        Texture2D temp2 = new Texture2D(tempRT.width, tempRT.height, TextureFormat.ARGB32, false);
        //计算贴图
        Graphics.Blit(temp2,tempRT,mat);

        //暂存当前激活的RT
        RenderTexture preview = RenderTexture.active;
        //激活渲染结果RT并从中读取数据
        RenderTexture.active = tempRT;
        Texture2D output = new Texture2D(tempRT.width, tempRT.height, TextureFormat.ARGB32, false);
        output.ReadPixels(new Rect(0,0,tempRT.width,tempRT.height),0,0);
        output.Apply();
        //还原激活的RT
        RenderTexture.active = preview;

        return output;
    }
最后是贴图的写入方法:
    //根据其他贴图的路径自动保存贴图
    private void GenPictureAuto()
    {
        string savepath = "";
        Texture2D output = GetTexture(ref savepath);
        if(maptype == 0) savepath += "_mask";
        else if (maptype == 1) savepath += "_detailmap";
        byte[] bytes = output.EncodeToPNG();
        FileStream file = File.Open(savepath + ".png", FileMode.Create);
        BinaryWriter writer = new BinaryWriter(file);
        writer.Write(bytes);
        file.Close();
        Texture2D.DestroyImmediate(output);
        output = null;

        AssetDatabase.Refresh();
    }
    //手动保存贴图
    private void GenPictureCustom()
    {
        string savepath = "";
        Texture2D output = GetTexture(ref savepath);
        string savePath = EditorUtility.SaveFilePanel("Save", Application.dataPath, "Texture.png", "png");
        File.WriteAllBytes(savePath,output.EncodeToPNG());
        AssetDatabase.Refresh();
    }
Shader
众所周知() Blit()使用的Shader很简单,只需要改一下通道即可,这里就只放Frag()部分:
fixed4 frag (v2f i) : SV_Target
            {
                fixed4 col;
                if(maptype == 0||maptype == 2)
                {
                    col.r = tex2D(_Metallic,i.uv).r;
                    col.g = tex2D(_Occlusion,i.uv).r;
                    col.b = tex2D(_DetailMask,i.uv).r;
                    if(useRoughness == 1 && maptype == 0)
                    {
                        col.a = 1-tex2D(_Smoothness,i.uv).r;
                    }
                    else
                    {
                        col.a = tex2D(_Smoothness,i.uv).r;
                    }
                }
                else
                {
                    fixed4 deabedo = tex2D(_deAbedo,i.uv);
                    col.r = deabedo.r*0.3+deabedo.g*0.59+deabedo.b*0.11;
                    col.g = tex2D(_deNormal,i.uv).g;
                    if(useRoughness==0)
                    {
                        col.b = tex2D(_deSmoothness,i.uv).r;
                    }
                    else
                    {
                        col.b = 1-tex2D(_deSmoothness,i.uv).r;
                    }
                    col.a = tex2D(_deNormal,i.uv).r;
                }
                return col;
            }
参考
https://blog.csdn.net/enternalstar/article/details/122135726 https://blog.csdn.net/qq_23936433/article/details/107433042

by ERIN.Z