
Separable Subsurface Scattering 可分离的次表面散射
Separable Subsurface Scattering,简称SSSS,是较新的SSS算法(2015)。 通过水平和垂直卷积2个Pass来近似,效率更进一步提升,这是目前游戏里采用的主流技术,Unreal也对其进行了集成。 具体推导的过程我努力读了!但我读不懂!差太多数学没学了。。
简单来讲,是利用均匀介质反射剖面的镜像对称性,将传统的二维卷积通过奇异值分解(SVD)分解为一维卷积核。
对于我们这种数学菜鸟来说,其实可以直接用预计算好的核:
SSSS_N_SAMPLES 11
float4 kernel[] = {
    float4(0.560479, 0.669086, 0.784728, 0),
    float4(0.00471691, 0.000184771, 5.07566e-005, -2),
    float4(0.0192831, 0.00282018, 0.00084214, -1.28),
    float4(0.03639, 0.0130999, 0.00643685, -0.72),
    float4(0.0821904, 0.0358608, 0.0209261, -0.32),
    float4(0.0771802, 0.113491, 0.0793803, -0.08),
    float4(0.0771802, 0.113491, 0.0793803, 0.08),
    float4(0.0821904, 0.0358608, 0.0209261, 0.32),
    float4(0.03639, 0.0130999, 0.00643685, 0.72),
    float4(0.0192831, 0.00282018, 0.00084214, 1.28),
    float4(0.00471691, 0.000184771, 5.07565e-005, 2),
};
根据不同的质量需求,这个核有多个版本,也可以用calculateKernel()生成。上文列举的是11次采样的核,最终作业里用的是25次采样的高质量版本。
后处理PASS
这里用了两个pass实现vertical、horizontal两个方向的卷积,两个pass的代码基本是一致的,只需要更改一下vec2 dir和渲染目标即可。
缩放比例
后处理除了之前的渲染结果外,还用到了深度纹理,以及视锥相关的fov、近远平面等信息,以获取片元线性的准确深度值。 (之前灯光视图的深度图使用的是正交投影,所以深度本来就是线性的,就不需要转化了~)
    // Fetch linear depth of current pixel:
    float depth = texture(temp_depth, TexCoords).r;
    depth = depth*2.0 - 1.0; //remap to NDC
    float linearDepth = (2.0 * near * far) / (far + near - depth * (far - near));

    // Calculate the sssWidth scale (1.0 for a unit plane sitting on the
    // projection window):
    float distanceToProjectionWindow = 1.0 / tan(0.5 * radians(fov));
    float scale = distanceToProjectionWindow / linearDepth;
卷积
利用已有的核,代码部分其实和一般的后处理差不多~ 注意offset后对深度进行了限制,如果offset后的深度变化过大,会lerp到原本的片元颜色,一定程度上避免结构线的模糊(当然ssss的总效果也会弱一些)。
    // Calculate the final step to fetch the surrounding pixels:
    vec2 finalStep = SSSSwidth * scale * dir;
    finalStep *= sssstencil; // Modulate it using the alpha channel.
    finalStep *= 1.0 / 3.0; // Divide by 3 as the kernels range from -3 to 3.

    // Accumulate the center sample:
    vec4 colorBlurred = vec4(colorM,1.0);
    colorBlurred.rgb *= kernel[0].rgb;

    // Accumulate the other samples:
    for (int i = 1; i < SSSS_N_SAMPLES; i++) {
        // Fetch color and depth for current sample:
        vec2 offset = TexCoords + kernel[i].a * finalStep;
        vec4 color = texture(temp_sss, offset);

        // If the difference in depth is huge, we lerp color back to "colorM":
        // If the difference in depth is huge, we lerp color back to "colorM":
        float depth_offset = texture(temp_depth, offset).r;
        depth_offset = depth_offset*2.0 - 1.0;
        float linear_depth_offset = (2.0 * near * far) / (far + near - depth_offset * (far - near));
        float s = clamp(100.0f * distanceToProjectionWindow *
                               SSSSwidth * abs(linearDepth - linear_depth_offset),0.0,1.0);
        color.rgb = mix(color.rgb, colorM.rgb, s);

        // Accumulate:
        colorBlurred.rgb += kernel[i].rgb * color.rgb;
    }

    color = colorBlurred.rgb;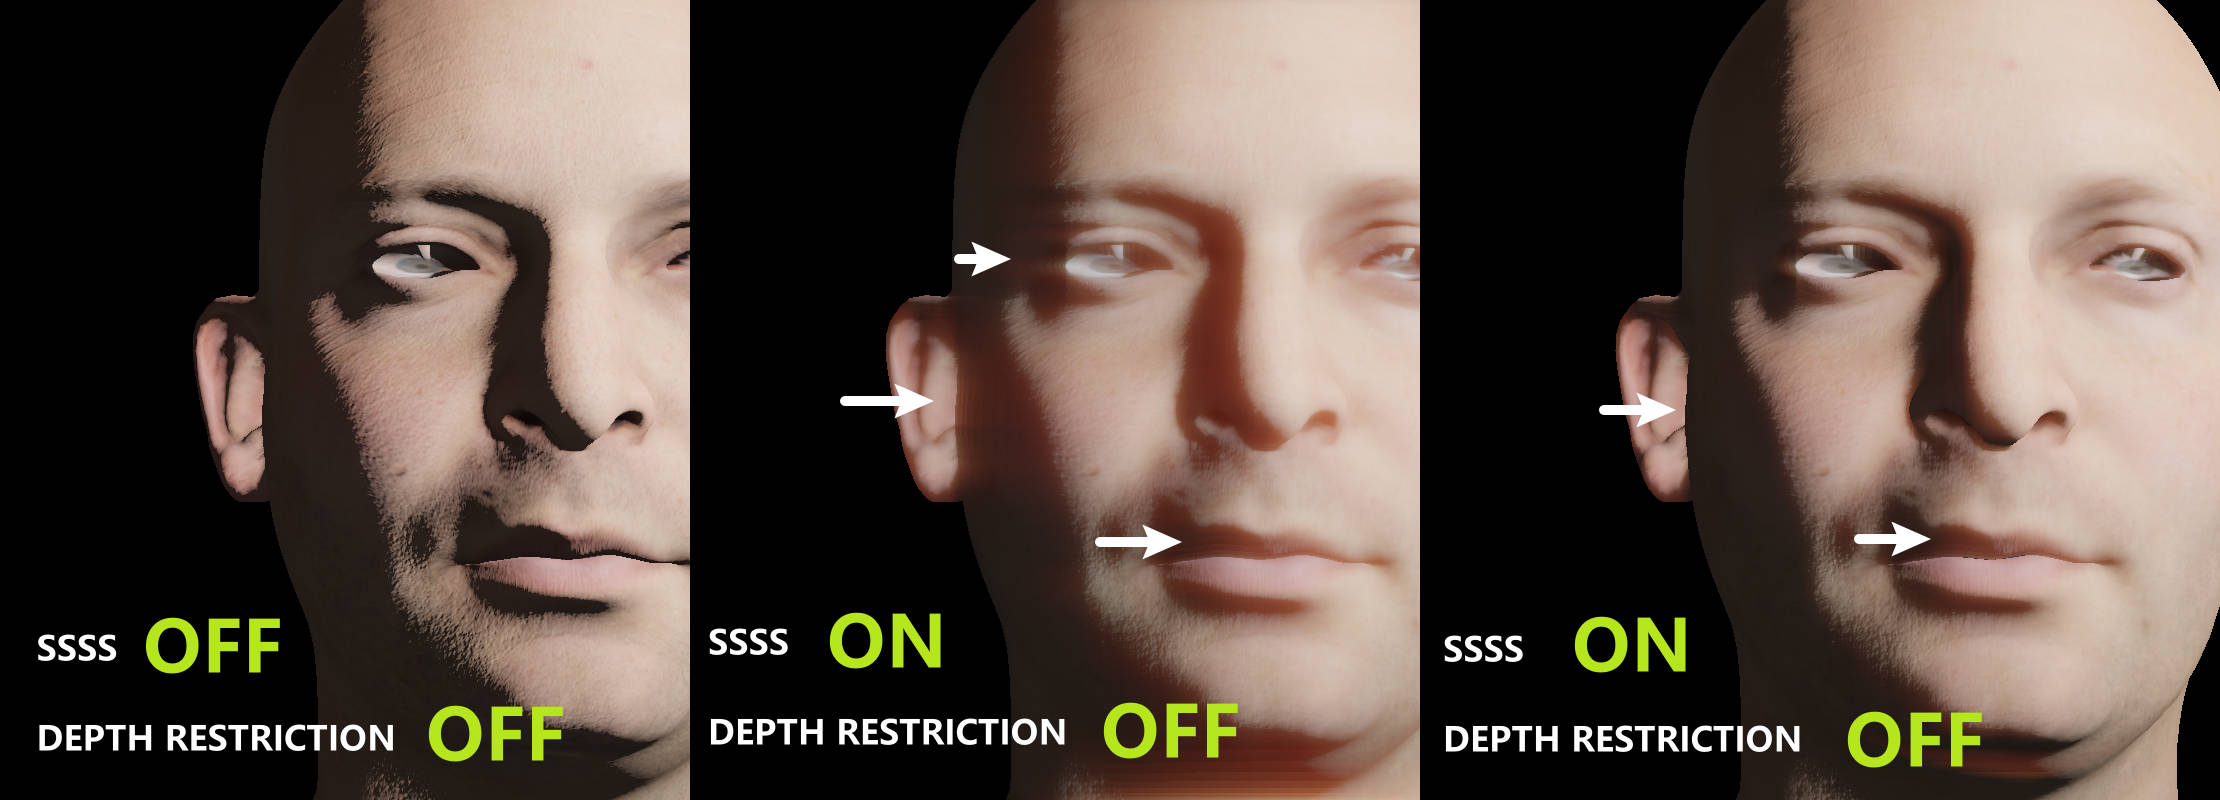
告一段落!
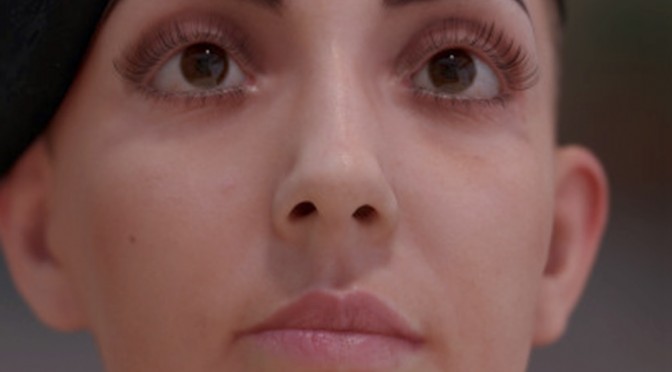
基础的屏幕空间SSSS效果(可不可以叫SSSSSS)就是这样啦:
 还有很多明显的瑕疵,这个大作业从研究assimp库读模型、看pbr帧缓冲延迟渲染&研究sss算法陆续也写了一周了,得先放下去搞搞python的流体力学了。
如果之后有空把AA和阴影补上(这发光的眼眶真是受不了)。另外在UE的虚拟人皮肤渲染中,还用了双镜叶高光、毛孔渲染等等,如果交大作业之前还有时间再慢慢完善咯!
还有很多明显的瑕疵,这个大作业从研究assimp库读模型、看pbr帧缓冲延迟渲染&研究sss算法陆续也写了一周了,得先放下去搞搞python的流体力学了。
如果之后有空把AA和阴影补上(这发光的眼眶真是受不了)。另外在UE的虚拟人皮肤渲染中,还用了双镜叶高光、毛孔渲染等等,如果交大作业之前还有时间再慢慢完善咯!
Reference

by ERIN.Z